PetNest
What Is It?
PetNest is a base-side raising and collection system: kill bosses, bring their relics home, raise the cubs, take one along, or send them somewhere you would not go yourself.
It is not a ninth game mode. It adds a second reason to run any existing mode: should I bring a cub this time? Have I collected an egg from that boss yet?
PetNest is on by default and needs no setting turned on anywhere — build the nest and it works.
Getting Started
1. Kill bosses, collect relics
Every boss kill feeds two tracks at once:
- Relic Egg (the lucky track): a low-probability direct drop of that boss's egg. It follows that boss's normal loot path — into the loot crate in standard arena and From Scratch, onto the ground in Infinite Hell (no crate there), and on the boss itself only in Faction War and Blood Hunt, where you do have to search the body.
- Boss Relic Soul (the guaranteed track): always dropped, scaled by the boss's max health. Souls are only used to condense an egg of that bloodline — they are not currency and never enter shops.
Drops cover the three standard difficulties, From Scratch, Faction War and Blood Hunt. Fate Echo, the Black Market Duck Cup and Zombie Mode do not drop relics - Bosses in those three modes spawn through their own separate paths and never enter the relic ledger.
2. Build a PetNest in your base
Find "PetNest" in the base bunker's build menu. Once built, interacting with it offers four options:
- Open PetNest — cub roster, deployment slot, soul ledger
- Hatch Relic Egg — hatch an egg, or condense one from stored souls (240 souls of that bloodline per egg)
- Send on Expedition — dispatch a cub to one of three disaster destinations
- Relic Museum — bloodline index and memorial
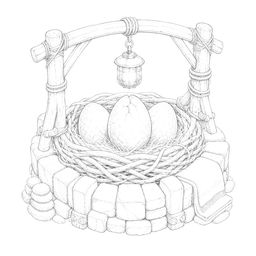 The Relic Nest
 Relic Egg
3. Hatching
Hatching locks in three things at once, with no rerolls:
- Two endowments — small bonuses to move speed, damage, health, pet backpack slots, and so on
- One temperament — Reckless / Cautious / Lazy / Loyal
- Shiny — an approximately 1.5% material variant, purely a collector's honour, tracked separately in the index. It grants no stats at all; it's just proof of luck
If an egg's bloodline can no longer be identified after a game update, the system says so and leaves your egg untouched rather than consuming it.
Taking a Cub Into a Run
Deployment slot
- One cub per run. Set it as "deployed" in the nest — it does not take an inventory slot.
- The system spawns it beside you on entry. It follows you and finds its own targets.
- Its damage is a garnish, not a game-changer. The value is pressure, finishing blows, and simply having it there.
Scavenging backpack
While a cub is out with you, the pet backpack travels with it. Capacity comes from your own pet-capacity stat, and the cub's endowments can add a few more slots.
While you are there, it does not die
- A downed cub does not die. It is carried off wounded: out for the rest of the run, restored when you return to base.
- Each knockdown leaves a scar: when, which map, and who put it down — plus one small permanent debuff.
- Scars are a résumé, not a punishment. Each cub has a scar cap; older ones merge into an "old wounds" count.
Where cubs are not allowed
- Cubs allowed
- The three standard difficulties
- From Scratch / Faction War / Blood Hunt
- No cubs
- Fate Echo: a grudge between two has no room for a third
- Zombie Mode: it runs its own lifecycle and rewards
- Black Market Duck Cup: a spectator mode, you never step onto the field
- Base: cubs idle around the nest, up to 3 at once
Disaster Expeditions
This is the only place in the system where a cub can truly die.
Three destinations
- Storm Sea: the disaster is a thunderstorm, matching the Electricity element
- Acid Rain Ruins: the disaster is acid rain, matching the Poison element
- Frozen Waste: the disaster is a blizzard, matching the Ice element
When a cub's bloodline element matches the destination, its success rate goes up — so collecting different bloodlines has a mechanical payoff, not just an index number.
Three risk tiers
The tier sets the payout, the risk and the wait all at once (the wait is real time):
- Safe: 2 hours, low reward, 0% death rate — completely safe, the worst case is coming home empty-handed. +15 experience on return
- Rough: 4 hours, medium reward, about 6% death rate — the cub may come back wounded. +30 experience on return
- Desperate: 8 hours, high reward, about 12% death rate — you are betting a life on rare output. +60 experience on return
The death rate is written on the button before you commit, and it is frozen into that departure — later balance changes never alter a trip already under way.
Countdown and settlement
- The countdown runs on real time: it keeps ticking while the game is closed.
- Returning to base settles automatically, then turns the cards one by one: loot / wounded / empty-handed / a death notice.
- The card flip is only a replay — the outcome was decided and saved the moment you walked into base. Quit mid-flip and the card is still waiting next time.
- A real death is irreversible: the cub leaves the nest and its name goes on the memorial.
Relic Museum
- Bloodline index — one page per bloodline, unlocked on first hatch. Tracks kills, hatches, shinies, highest level and expedition count.
- Memorial — cubs lost on expeditions are carved in permanently: name, bloodline, where they fell, the risk tier you chose, the death rate at departure, and their career record. You pressed "Desperate"; the epitaph remembers that for you.
- Taming achievements — First Hatch, Bloodline Collector, Lineage Obsession, The Pale Purple One (shiny), A Name on the Stone.
Levels
Cubs grow by working with you, capping at level 10 ("Adult"), after which they stop growing.
- Experience:
- Deploying a cub and coming home alive: +10 (a cub carried out wounded still counts; the scar is already the price)
- Each of its own kills: +2, capped at +30 per run
- Surviving a Disaster Expedition, by tier: Safe +15, Rough +30, Desperate +60
- 100 experience per level, capped at level 10.
- What levels give — +1 pet-backpack slot every 3 levels, so +3 at max, stacking with the base slots and endowment slots.
- The index records the highest level reached for each bloodline.
Nest capacity and releasing
- The nest starts with 12 places. It expands by +4 each time your index reaches 10 / 20 / 30 unlocked bloodlines, up to 24.
- Releasing — pick a cub on the nest page and release it to get back 60 relic souls of its bloodline. Releasing is permanent and the cub is not memorialized; a cub away on an expedition cannot be released. This is the predictable way to make room when the nest is full, instead of gambling a Desperate expedition and waiting for a cub to die.
Tips
- Souls exist only to condense eggs. Bank 240 of one bloodline and you can target that boss's egg directly — unlucky players can still complete the index. Releasing a cub refunds 60 souls, so four released cubs pay for a fresh egg.
- When the nest is full, expand or release: unlocking more bloodlines raises the cap, releasing frees a place immediately and refunds some souls.
- Eggs are easiest to track in the top level of your bag or storage. Eggs tucked inside crates and containers are now found too, but the outer level keeps the count obvious.
- Want a safe trickle? Send Safe runs. Want to gamble? Read the death rate before you press Desperate.
- A cub on an expedition cannot be deployed or removed — the tension is exactly in those few days without it.